Many people are confused when they see the word ‘3D’ tagged on in front of the words ‘Animation Studio’.
Although animation has been with us for as long as a few decades now, the concept of animation still seem pretty much magical to the layman. ‘How do you make drawings come alive on screen?’ is what they usually ask. With the invention of 3D animation technology, the concept of animation becomes even more hazy and mystical to the layman. They still refer to 3D animation as ‘drawing’ and know not a thing about the process that goes on behind 3D animation.
As the owner of a 3D animation studio, I feel that it is very important to educate our clients on what goes on behind 3D animation production. The knowledge will not just help them appreciate the service better, but also helps to facilitate the process of collaboration and manage their expectations. This is important because it helps our clients achieve what they want and allows us to communicate effectively with them.
For this purpose, I’ve written this article – which hopes to demystify the process of a 3D animation production and unveil what goes on behind the closed doors of a 3D animation studio.
Get prepared for an educational journey!
TVC Showreel from Mediafreaks on Vimeo.
A key player in the animation industry in Singapore, Mediafreaks is an animation production company that focuses on working closely with producers, distributors, broadcasters and partners worldwide to produce original television content and high-end animation for broadcast and marketing purposes.
Established in 2003, Mediafreaks has since produced hundreds of projects spanning from animated cartoon series to television commercials to CGI for documentaries to medical and architectural visualization work.
Mediafreaks focuses mainly on providing service work and its sister companies Mediafreaks Cartoon and Character Farm create their own original animated content for export into the international market for broadcast and licensing.
So What Is 3D Animation?
Do not be fooled by the seeming simplicity of this question.
I was actually quite tempted not to write this article because it’s such a difficult topic to write on. It can be answered as complicated as you want it to be or as short as you desire. The thing is, I need to let clients know how complicated the process is, but not to let them walk away confused. Saying that I will try my best to answer this question in the most concise but uncomplicated way possible.
In a nutshell, computer 3D animation refers to the work of creating moving pictures in a digital environment that is three-dimensional. Through the careful manipulation of objects (3D models) within the 3D software, we can then export picture sequences which will give the illusion of movement (animation) based on how we manipulate the objects.
What happens in animation is that motion is simulated in a way that the eyes tend to believe that actual motion has taken place while the fact is the perceived sense of motion is only because of the consecutive images that are passed through very fast.
This theory is inherent be it for 3D, 2D or stop motion animation.
In traditional 2D animation, pictures are hand-drawn and every one showing subtle changes from the previous. When played back sequentially, it creates the illusion of motion. In stop motion animation, real-life models are moved slightly and filmed. Again, the pictures will create the illusion of motion when played back. In 3D animation, everything is done within the computer and exported from the computer.
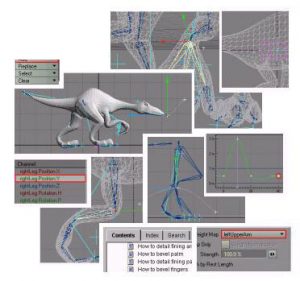
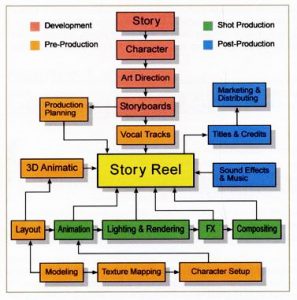
The process of creating 3D animation can be sequentially divided into three phases: modelling – which describes the process of creating the 3D objects within a scene, layout and animation – which describes how objects are positioned and animated within a scene, and rendering – which describes the final output of the completed computer graphics. Through the combination of the above phases and a few other sub-phases, this completes the process of a 3D animation production.
There is much software in the market for creating 3D animation, ranging from the cheaper lower-end ones to the professional high-end versions. If you are curious to see how a 3D software works, you can download a free one called Blender. Just Google it and you will be able to find its official website.
2D Cel animation involves illustrating many pictures of a scene in various phases of movement and flipping through them quickly digitally to create the illusion of movement or animation.
3D computer animation is a costlier and time-consuming process compared to 2D animation as it involves many more steps.
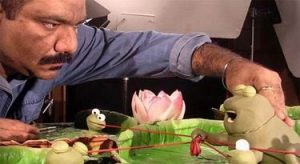
Stop-motion animation is a painfully tedious process and involves tweaking the models bit by bit!
What’s the Difference between 2D and 3D anyway?
Isn’t it obvious? Errr…not quite…read on to find out why.

The first concept you must grasp is that 3D means 3 dimensional and 2D means 2 dimensional. Now before you think I’m stating the obvious, let me go on to say that the 3D and 2D in animation refer to the dimension in which the animation was created. Ahhhh. The plot thickens eh?
For 2D animation, everything happens on a 2-dimensional platform. Pictures are flat, without depth and offer only one perspective. Objects and characters are usually drawn without the subtle soft shadows we see in real life and colours have few varying shades. In 3D animation, everything happens on a 3-dimensional platform. Pictures have depth and offer multiple perspectives just like in real life and have soft subtle shadows cast on the objects and characters within.
In 2D, characters look cartoonish and unrealistic. In 3D, characters can look cartoonish but realistic at the same time.
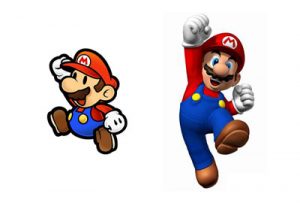
Super Mario in 2D and 3D, Copyright(C) Nintendo. See the difference?
Another way to think of this is to think in terms of a painting and a sculpture. 2D is a painting, and 3D is a sculpture. 3D introduces “depth perspective,” so we not only see a rectangle (2D) but a CUBE (3D). You may also want to think of it like being the difference between a photograph of a glass of water (2D) and being able to reach out and actually pick up the glass of water (3D).
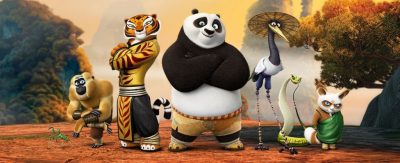
You could start training yourself by comparing a cartoon-like Bugs Bunny, Aladdin, Lion King (2D) to “Toy Story 1, 2 & 3, “Finding Nemo” and “Incredibles” (3D). If you have not watched any of these great cartoons, you should grab one right away or be branded Neanderthals forever!
Typically, 2D involves “drawing,” or movement on, say, a flat surface (sketch pad, etc.) or in the vertical and horizontal planes. 3D involves “modelling,” i.e., creating objects in 3-dimensions using a computer software, residing in an expansive virtual environment, complete with lights, reflections, other objects, shadows, etc.
Is 3D Animation an Offspring of 2D Animation?
Many people have the idea that 3D animation stemmed as a progression from 2D animation. While not entirely untrue, this is definitely not the whole truth as well.
If we have to make some form of a link, then I would say that 3D animation has more of its roots in stop-motion animation than in traditional hand-drawn 2d animation. The stop-motion film techniques were used very well in the 1963 film Jason and the Argonauts by Ray Harryhausen, although they have actually been around since the very early days of film in the late 19th century. But it was Ray Harryhausen who really brought the technique to life.
You might want to know also that the original King Kong movie produced in 1933, also used stop-motion techniques extensively.
Comparing 3D animation and stop-motion, we can actually see where the similarities are.
For stop motion, it involves taking a model and filming one frame at a time. Slight changes are made to the model and then filmed again. This is to simulate movement. By building up frame after frame and playing it back at between 12 and 70 frames per second, the model looks like it is moving. This is a very painstaking process and by no means a walk in the park!
3D animation uses a similar method but it is created using computers. Everything is controlled within the computer and the output is automated by the computer after you key in the instructions. It is decidedly less tedious physically compared to stop-motion animation, but the fundamentals are similar in nature.
Even the lighting, texturing and camera aspects of both animation methods share the same fundamentals, with the exception that one happens in reality, and the other on the computer.
I would think that for a stop-motion artist to transit over to 3D animation and vice versa, it would be a lot easier and faster, as opposed to a 2D artist. And having said that, I would end this section by saying again that 3D animation smells more like an offspring of stop-motion animation than 2D animation.
The Process of 3D Animation
There are probably more steps to 3D animation than you think there are!
The process of a 3D animation pipeline is complex and can be a lot more complicated than any other forms of animation.
Depending on what project and which 3D animation studio is involved, the number of steps may vary.
In this lens, I’ve identified and illustrated the 11 most common steps involved in producing a 3D animation project.
They are namely:
- Concept and Storyboards
2. 3D Modelling
3. Texturing
4. Rigging
5. Animation
6. Lighting
7. Camera Setting
8. Rendering
9. Compositing and Special VFX
10. Music and Foley
11. Editing and Final Output
Step 1 | Concept and Storyboards
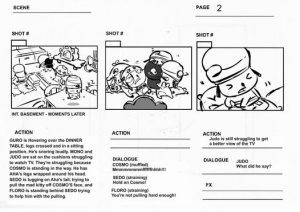
A storyboard for Mighty Pups – a cartoon series by Mediafreaks!
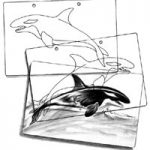
The very first step involved in a 3D production pipeline is the conceptualization of ideas and the creation of the storyboards that translate these ideas into visual form.
A storyboard is a sequence of illustrations that showcase your digital story in two dimensions. The first dimension is time: what happens first, next, and last. The second is of interaction: how does the voiceover (your story) interact with the images, how do visual transitions and effects help tie together the images, how does the voice overs interact with the musical soundtrack? Any element can interact with any other one, and the storyboard is the place to plan out the impact you intend to make on the audience.
Step 2 | 3D Modelling
3D Modelling is not drawing!
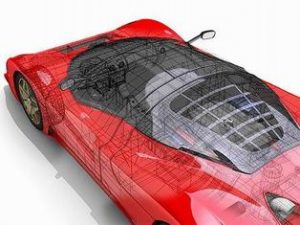
After the storyboards are finished and approved by the client, the task of building the props, environment and characters begin. The proper term is called ‘modelling’.
Modelling is the process of taking a shape and moulding it into a completed 3D mesh. The most typical means of creating a 3D model is to take a simple object, called a primitive, and extend or “grow” it into a shape that can be refined and detailed. Primitives can be anything from a single point (called a vertex), a two-dimensional line (an edge), a curve (a spline), to three-dimensional objects (faces or polygons). Using the specific features of your chosen 3D software, each one of these primitives can be manipulated to produce an object. When you create a model in 3D, you’ll usually learn one method to create your model, and go back to it time and again when you need to create new models. There are three basic methods you can use to create a 3D model, and 3D artists should understand how to create a model using each technique.
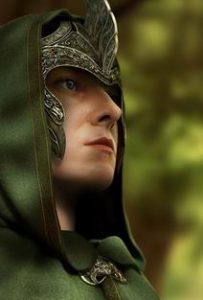
Step 3 | Texturing
The art of giving clothes to the 3D models.
When a 3D model is created, 2D images can be overlaid on it to add colours, designs, and textures. This is called mapping, and often the entirety of a model’s colour comes from this. These maps can be created in programs like Photoshop, and the illusions of textures can be brushed onto the models as easily as if you painted them yourself; some animators even use real photographs of the textures they’re trying to create, simply captured and then altered to make seamless repeatable patterns. This is how many illusions of hair are created; rather than model individual strands, instead of grouped locks of hair are modelled, before a texture is overlaid with individual strands and details painted on.
Step 4 | Rigging and Skinning
We’ve gotta put in those skeletons into a 3D character before he can move!
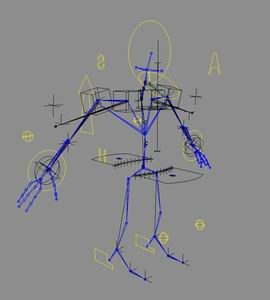
Setting up a character to walk and talk is the last stage before the process of character animation can begin. This stage is called ‘rigging and skinning’ and is the underlying system that drives the movement of a character to bring it to life.
Rigging is the process to set up a controllable skeleton for the character that is intended for animation. Depending on the subject matter, every rig is unique and so is the corresponding set of controls.
Skinning is the process of attaching the 3D model (skin) to the rigged skeleton so that the 3D model can be manipulated by the controls of the rig.
Step 5 | Animation
Now you know animation doesn’t always come first in 3D animation huh?
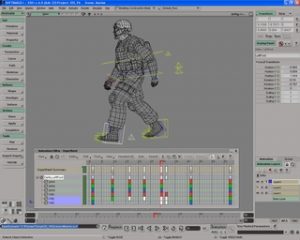
Animation is the process of taking a 3D object and getting it to move. Animation comes in a few different flavors. There’s keyframe animation, where the animator manipulates the objects on a frame-by-frame basis, similar to old hand-drawn cartoons. Other methods of animation include placing objects on splines and setting them to follow the path of the curve, or importing motion capture data and applying it to a character rig. Yet another way to animate is to use your 3D application’s built-in physics engines, such as when your scene requires that objects fall.
Step 6 | Lighting
Lighting in a 3D world is just as essential as it is in real life.
Lighting, (in combination with textures, camera angle etc.) is where a scene has the potential to come alive. Used improperly, light can wash out a scene, make objects appear hard or flat, and destroy all the hard work. But skillfully applied, lighting can make a scene convincing, or if realism is the aim, create (in combination with materials and geometry), a scene that is virtually indistinguishable from real life.
In 3D, lights don’t actually exist as they do in the real world. Lights in 3D are objects that are designed to simulate how lighting works in real life, but in order to obtain the results you’re after, you have to apply a number of settings, not only to the lights, but to the materials.
Step 7 | Camera Angles and Techniques
Good camera angles and techniques make the difference between good cinematography and bad ones.

A camera is an amazing tool. In 3D, unlike the real world, physical limitations don’t exist. You can create a scene where the camera takes you on a journey inside the blood vessels of a human body, or to be an eye-in-the-sky in your scenes, it can be used to create impossible perspectives, to zoom and pan and so much more. It’s beyond the scope of this article to tell you everything about cameras, but here are some basics to get you started.
First, it’s useful to look at some of the differences between 3D cameras and real-life cameras. In 3D, unlike in real life, there is no need for a lens, focusing controls, film, aperture, etc. All of these functions are controlled via software. Where things are similar is how the camera is used. In 3D, you can create one or more cameras, position them exactly as desired in 3D space and use settings to mimic focal length, depth of field, etc. Other options for moving a 3D camera are similar to those in movie making, including truck, dolly, motion blur, orbit and pan.
In addition, software cameras have no size or weight restrictions. You can move a camera to any location and even inside the tiniest objects. You can also animate cameras so that several operations take place at once, such as a zooming into a scene while changing the depth of field. Once you create a camera in 3D, you can pick a view and assign the view in that view to the camera, meaning that you will see the scene from the perspective of the camera.
Step 8 | Rendering
This is where the graphics get ‘made’ and exported…but it’s not the end yet!!!
Rendering an image is typically the last step in the 3D production pipeline (but not the last step in the overall production pipeline), and is perhaps the most important part. It is a step often overlooked or glossed over by beginners, who are more focused on creating models and animating them. There are many aspects to creating a good final render of a scene, including attention to camera placement, lighting choices which may affect mood and shadows, reflections and transparency, and the handling of special effects, like fluids or gasses.
Step 9 | Compositing and Special FX
The renders are brought into compositing programs to edit, touch up and add on special effects
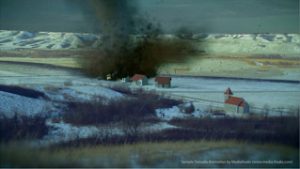
This is where the final renders are brought into compositing programs to edit, touch up and add on special effects.
Compositing includes everything from what you probably normally think of as special effects, where things explode, evaporate, morph, etc. It also includes stage extensions (making the scene stage larger digitally in post-production), environment creation (anything from buildings to complete worlds), to blue/green screen replacement (shooting in front of a blue or green screen and then replacing the background with digitally created footage or footage shot elsewhere). Basically, the art of taking live footage and blending it with computer-generated footage would be considered compositing.
Step 10 | Music and Foley
Music and foley (sound effects) are added to give the animation extra depth and boost in audio enjoyment.

A music composer will create music soundtracks and accompaniment music to set the mood for the animation.
A foley artist ‘recreates’ sound effects for film, television and radio productions. Using many different kinds of shoes and lots of props – car fenders, plates, glasses, chairs, and just about anything I find at the side of the road – the Foley Artist can replace the original sound completely or augment existing sounds to create a richer track.
Step 11 | Editing and Final Output
This is where it ends!
This is where it all ends! This is where the composited renders, music and foley are compiled and edited to ensure that everything is in synchronization. Once satisfied, the compiled product is exported as one of the many formats suitable for broadcasting standards and delivered to the client!
Picking the Right 3D Animation Studio to Work With
Picking the right animation company for your project will determine the success and failure of your marketing effort.
That’s not so difficult to answer, is it?
Of course, you go to Mediafreaks!
Alright, seriously now, no single company is suitable for every single project under the sun. I would like to say that Mediafreaks is good at everything, but unfortunately, we are not.
Some companies excel at certain genres and other companies in other genres.
Mediafreaks specializes mainly in animated commercials, broadcast animation for documentaries, medical visualization, character design and architectural visualization. There are companies that specialize solely in special effects or architectural visualization work.
The following is my honest advice regarding this subject matter:
- Find a company that has an extensive portfolio or one that has done something similar to what you have in mind. The first ensures an experienced company and the second gives you the confidence that they have done something similar before and can probably deliver the same to you.
- Make sure that the company is using more in-house staff than freelancers. Many freelancers are unreliable and may disappear when the going gets tough. Ultimately the company is responsible for their conduct, but you would have wasted your time and perhaps missed a good opportunity to impress with your presentation or marketing campaign. So you stand to lose out even if you don’t have to pay for the project ultimately.
- Ask for milestones and deliverables. Understand what the company’s pipeline is like. Any animation companies worth their salt would be able to tell you a pipeline and milestone delivery that sounds logical and reasonable. Click here if you missed my section on Working with an Animation Company to find out more.
- Find a company that responds fast to emails and phone calls. If the company takes a long time to return emails and calls, chances are they are either too busy to respond, can’t be bothered to respond or too disorganized to respond. Either way, you should move on and look for the next vendor.
- Find a company that has project managers or account managers in place. You want to speak to speak to marketing people who understand your marketing needs and not animators who think about cool special effects and nice animation.
- After giving concise background information about your company and what you want to achieve, see how fast and pro-active the company is in coming back with a proposed solution and a quotation. See if the quotation makes sense and that the company can account for each of the service listed.
- I would not advise going around for quotations because quite honestly every animation company may charge differently according to their staff strength, reputation, portfolios, whether they are using freelancers or perm staff, standard of work, etc. There are too many variables and it is akin to comparing the prices of cars of different makes. It won’t be fair in this respect. Try to go for whichever company can possibly deliver what you need within your budget.
- Lastly, always work with a company you feel comfortable with. Go with your gut feeling. If you don’t feel good about the company, it means you don’t have chemistry with the people there and chances are you won’t enjoy the working relationship. This will affect the end product.
Case Studies
The use of computer animation in marketing and advertising is potent as a communications tool. Many companies are discovering that it is much more effective and powerful than the boring PowerPoint slides and mundane TV adverts that use only live actors. While it shares some characteristics of other visual mediums, it has unique attributes that no other marketing medium can equal.
Let’s take a look at how your company can tap into the capabilities of this great marketing tool by studying some true case studies of how some other companies have been doing it.
Case Study: Hi-Corporation and Sharp
HI CORPORATION is a leading research and development company in middleware development for embedded devices whose flagship product MascotCapsule® is a real-time 3D rendering engine. In addition to all Japanese carriers and handset manufacturers, the engine has been widely adopted in the US, Europe, Korea, and China. Character Farm and Mediafreaks Cartoon – both sister companies of Mediafreaks Pte Ltd. specializing in the creation of original animated content – have entered into a licensing collaboration with HI CORPORATION to release a set of original characters from the animated series Katakune™ and Sedo Dog™ to be offered as downloadable content for mobile phones released in Japan. These characters will be used for a service where users can set characters to display on their mobile phone standby screens, menu screens, and other screens. The character moves around the mobile phone screen and reacts according to events such as incoming calls and mail. A character from the Sedo Dog™ family has been embedded into a high-end Sharp mobile phone as a default offering. This case study shows how cartoon characters can be used to make a product more enticing. Please click on the pictures or the link below to learn more about our cartoon characters and licensing opportunities.
Case Study: APMI Kaplan
APMI Kaplan Walkthrough by Mediafreaks from Mediafreaks on Vimeo.
APMI Kaplan – a quality educational facility – wanted to showcase their brand new campus. However, in most cases, reality is imperfect and live shoots usually amplifies that imperfection. A 3D animation walkthrough helped to create the experience of studying in Kaplan’s beautiful environment, sans the imperfections. The educational sector being a very competitive one, this extra presentation effort immediately helps to establish Kaplan as the right place to study.
Case Study: Shark Energy Drink
Shark Energy TV Commercial from Mediafreaks on Vimeo.
Field Catering wanted to bring across how their Shark Energy drink can restore energy to the most exhausted individual. Mediafreaks came up with a concept that showed how Shark can power up an entire city. Sure it is an exaggeration, but all TV adverts build on hype, and 3D animation does that the best! The conventional live TV adverts can never achieve this kind of effect. The Shark Energy Drink TV advert was shown during the New Year period to good response.
Case Study: Schering Plough Clarityne
Clarityne TV Commercial from Mediafreaks on Vimeo.
Schering Plough wanted a different approach towards showcasing their Clarityne product – which helps curbs nose allergy problems. Mediafreaks came up with an animated TV commercial that discusses how allergens bring about the allergy symptoms and how Clarityne can help improve the quality of life. Again, if this was a ‘live-actor’ advert, the result would be much more boring and less effective. The graphics concept was also implemented on buses as mobile giant ads.
Case Study: Pilot Pen V-Grip
Pilot Pen V-Grip TV Commercial by Mediafreaks from Mediafreaks on Vimeo.
It’s tough to sell something as conventional and mundane as the humble pen. No matter how much technology has gone into it, unless the pen has been given a micro super-computer and can write on its own, a pen is still a pen. So how do you sell a pen? Check out this cheeky animated TV commercial of a family who finds so much fun using the new Pilot V-Grip that they prefer to pen their conversations to each other! Again, having the commercial done in 3D animated form brings out the fun and humour. A live advert just wouldn’t have done justice.
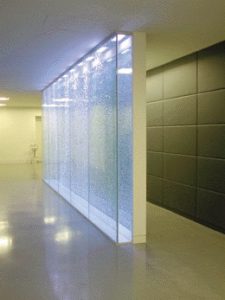
Case Study: Linden Place
Linden Place TV Commercial by Mediafreaks from Mediafreaks on Vimeo.
Linden Place is an up market residential property in China. The TV commercial that the developers wanted to produce should spoke to those who recognize class and prestige. Wanting to steer away from the conventional property commercials that are a dime a dozen, they decided to go for a beautiful and realistic 3D animated rendering of an exquisitely crafted plague that emits elegance, prestige and exclusivity. To create the plaque in real life was too expensive in comparison to a digital representation, and Mediafreaks came to the rescue.
Case Study: Wyeth Robitussin
Robitussin Red Cough Solution from Mediafreaks on Vimeo.
Robitussin Blue Cough Solution from Mediafreaks on Vimeo.
This set of 2 x 20 seconds TV adverts were designed to create impact advertising through exaggerating the effects a bad cough can induce on people. The different scenarios enacted here dramatize the effects of the 2 different kinds of coughs that the Robitussin cough solutions are formulated for. Through the cycling of the 2 different TV commercials, it generated curiosity and interest from the audience who realized that these were 2 different TV commercials featuring different cough solutions for varying cough conditions. Being in bursts of 20 seconds and coupled with the fact that the scenario in each TVC is rather dramatic, animation was the perfect and cheaper medium to execute these adverts.
This article was written by the founding Managing Director of Mediafreaks “Aldric Chang“ a creative businessman who is active in music composing and production, internet marketing, casual games production, animation production, cartoon production and character licensing.